|
ezyCheque Lite Edition - Bank Setup screen
Please select a topic below:
 Main screen Main screen
Bank Setup
• Add, edit, and delete bank's record
• Edit cheque's information
• Adjust cheque fields' location
• Adjust cheque's printing location
• Import and export EBF files
Options
Recipients
Print Preview
Add, edit, and delete bank record
Add bank record
Step 1: In the ezyCheque Bank Setup screen, click on Add button.
Step 2: Key in the Bank Name, Bank Code, Account Number, and Branch of the bank in the Bank Details tab (located below the cheque screen).
Step 3: Insert cheque information.
Step 4: Adjust the cheque fields alignment or import from existing cheque template file.
Step 5: After adjusting the cheque fields alignment, adjust the cheque's printing location according to the printer you use.
Step 6: Click on Save button to save the bank record.
Edit bank record
Step 1: In the ezyCheque Bank Setup screen, select the bank record that you want to edit and click on Edit button.
Step 2: Key in the Bank Name, Bank Code, Account Number, and Branch of the bank.
Step 3: Insert cheque information.
Step 4: Adjust the cheque fields alignment or import from existing cheque template file.
Step 5: After adjusting the cheque fields alignment, adjust the cheque's printing location according to the printer you use.
Step 6: Click on Save button to save the bank record.
Delete bank record
Step 1: In the ezyCheque Bank Setup screen, select the bank record that you want to delete click on Delete button.
Step 2: A dialog box opens and select Yes to delete. Else No.
Back to top
Edit cheque's information
This section teaches you which cheque's information is needed to align the cheque. Basically, the data below is required from a cheque and steps to obtain the information:
Latest used cheque number
The cheque number will show in the main screen for validation purpose each time you print the cheque.
Step 1: Take out your cheque book and open up the cheque book.
Step 2: Take the first blank cheque number and deduct by 1 (the previous cheque's cheque number).
Step 3: Insert the deducted cheque number in the Current Cheque # text box under the Bank Details tab.
Cheque date type
The cheque date type is used to determine how a cheque date is printed.
Step : Set the Date Type in the Bank Details tab according to the cheque date type as follow:
| Date Type |
Output |
Description |
| Date - Normal |
22 Jan 2008 |
Date format follows the one set by user in Options screen - General tab. |
| Date - ddMMyy |
220108 |
This date type is suitable for cheque which requires single digit of each date number written on six (6) boxes provided. |
| Date - ddMMyyyy |
22012008 |
This date type is suitable for cheque which requires single digit of each date number written on eight (8) boxes provided. |
|
Table: Date type description
Cheque size
Cheque size is used in fields location adjustment and cheque's printing location adjustment. Therefore, it is important to set the correct cheque height and width.
Step 1: Use a ruler and measure the cheque height and width either in centimeters or inches.
Step 2: Insert the cheque height and width in the Cheque Size - Height and Width text boxes located under the Bank Details tab.
NOTE : You can set the measurement unit either in centimeters or inches in Other Settings tab.
Cheque image
Cheque image is very useful when setting the fields location. To insert the cheque image, firstly you need to have the cheque image file either in jpg/jpeg/gif/bmp/png picture format. You can scan a cheque into the computer or download from the internet (if available). Please refer to your scanner user manual to scan the cheque and save it into a picture format file.
• Insert the cheque image
Step 1: To insert a cheque, go to Other Settings tab and click on Change... button.
Step 2: A Open File dialog box opens. Select the cheque image file you want to insert.
Step 3: Click Open once selected.
• Remove the cheque image
Step 1: Go to Other Settings tab and click on Delete button.
Step 2: A dialog box opens confirming the delete of cheque image. Click Yes to remove.
Back to top
Adjust cheque fields' location
Cheque fields consist of Payee Name, Date, Amount, Amount in Word and Company/Memo (in certain countries). The location of each field is important in determining accurate cheque printing.
There are two ways to set the fields location:
Adjust cheque fields' location with cheque image
Before adjusting cheque fields' location, make sure that the cheque date type, cheque size is set accordingly and the cheque image is inserted into the cheque screen.
Step 1: Move the Recipient field by click, hold and drag the center of the field to the Pay empty location on the cheque image (where it should be written the Payee Name).
Step 2: Adjust the field width by click, hold and drag the left or right small purple square located at the line of the field.
Step 3: Adjust the field's font, font style, and font size by click on the Change... button under the Field Settings tab.
Step 4: Repeat Step 1, Step 2, and Step 3 for Date, Amount, Amount in Word #1, Amount in Word #2 and Company Name/Memo (if applicable) fields.
Step 5: To make sure that the fields is set accurately, click on the Print Sample button under Print Settings tab. Put a real cheque beneath the sample output paper and check whether the fields are set correctly or not.
Step 6: Readjust the fields if it was not set correctly. Reprint the sample output paper and check the fields setting again until you are satisfy with the fields setting.
Step 7: After complete adjusting cheque fields' location, continue further adjust cheque's printing location to make sure the cheque is print accurately.
Adjust cheque fields' location without cheque image
Before adjusting cheque fields' location, make sure that the cheque date type and cheque size is set accordingly.
Step 1: Print the cheque size ruler by clicking on the Print Ruler button under the Print Settings tab. A cheque size ruler is used to determine the fields location easily.
Step 2: Put a real cheque on top of the cheque size ruler paper you just printed.
Step 3: Determine the Pay empty space left and top measurement and key it into the Left (X axis) and Top (Y axis) text boxes under the Fields Setting tab. Make sure the Recipient field is active.
Step 4: Determine the width of the Pay empty space and key it into the Field Width text box.
Step 5: Adjust the field's font, font style, and font size by click on the Change... button under the Field Settings tab.
Step 6: Repeat Step 3, Step 4, and Step 5 for Date, Amount, Amount in Word #1, Amount in Word #2 and Company Name/Memo (if applicable) fields.
Step 7: To make sure that the fields is set accurately, click on the Print Sample button under Print Settings tab. Put a real cheque beneath the sample output paper and check whether the fields are set correctly or not.
Step 8: Readjust the fields if it was not set correctly. Reprint the sample output paper and check the fields setting again until you are satisfy with the fields setting.
Step 9: After complete adjusting cheque fields' location, continue further adjust cheque's printing location to make sure the cheque is print accurately.
Back to top
Adjust cheque's printing location
Adjusting cheque printing location is a critical step to make sure the cheque is print accurately. This is because every printer has different printing margin.
In the ezyCheque Bank Setup screen, go to Print Settings tab and click on Change... button. A Cheque's Location Adjustment dialog box opens.
Figure: Cheque's location & orientation settings screen
Before you adjust anything, please read the table below and understand which settings is best used for your printer:
| Printer Type |
Orientation |
Cheque Alignment |
Image |
Cheque Placement |
Dot Matrix Printer
(recommended) |
Portrait

|
 |
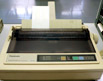 |
Cheque is placed to left side of the tray, facing back and insert from top.
Description:
most dot matrix printers have a roller which will roll the paper from behind to front. Therefore it must be placed facing back and mostly insert from top. |
|
Landscape

|
 |
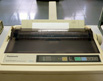 |
Laser Printer
(recommended) |
Portrait
|
 or or  |
 |
Cheque is insert at the center of the envelop tray, facing front with portrait orientation.
Description: most laser printers have a special tray for envelop. Cheque is insert from this envelop tray and is normally located at center. Landscape printing is not recommended as it will cause unnecessary paper jam. |
|
Landscape
|
Not recommended |
NIL |
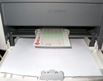
| Bubblejet / Inkjet Printer |
Portrait
|
|
 |
Cheque is placed to the left or right side of the tray, facing front with portrait orientation.
Description: most bubble-jet printers have either a paper tray insert from top or bottom. Both require cheque to be placed facing front and either to the left or right side of the tray. Same as laser printer, landscape printing is not recommended as it will cause unnecessary paper jam. |
|
Landscape
|
Not recommended |
NIL |
|
Table: Recommended cheque alignment for different type of printers
Please follow the instruction below to set the cheque's location:
Step 1: in the Cheque's Location Adjustment screen, select the Orientation that you prefer. It is recommended to use Landscape orientation for dot matrix printer and Portrait orientation for laser and bubblejet printers.
Step 2: Click on the recommended Quick Align button recommended in the Table above according to the Orientation you chose in Step 1.
Step 3: Insert a cancelled cheque or a mock cheque in the printer as recommended in the Table above. Click on Print Sample button to test print the cheque location you just set.
Step 4: The cancelled cheque or mock cheque you just test printed in Step 3 might not printed accurately. It might printed to a little right or bottom. If this is the case, adjust the Top and Left of the Cheque Location.
Step 5: Insert another cancelled cheque or mock cheque in the printer and test print again on the Top and Left cheque location you just set. Repeat Step 4 and Step 5 until the information is printed accurately in the cheque.
Step 6: Click OK to save the settings.
Back to top
Import and export EBF files
Importing EBF files to your exisiting bank record
• In the ezyCheque Bank Setup screen, select the bank record you would like to import the EBF file and click on Edit button.
• Go to Other Settings tab and click on  button. button.
• A dialog box opens and notify you that all current data of the bank will be replaced. Click Yes to continue.
• A Open File dialog box opens. Select the EBF file that you want to import and click Open.
• After the EBF file has been imported, you have to adjust the cheque location aligned to your printer.
• When done, click on Save button and Close the screen to start printing cheques.
Importing EBF files as new bank record
• In the ezyCheque Bank Setup screen, click on Add button.
• In the Bank Details tab, key in the Bank Name, Bank Code, Account Number, Current Cheque Number and Branch.
• When done, go to Other Settings tab and click on button to import the EBF file.
• A dialog box opens and notify you that all current data of the bank will be replaced. Click Yes to continue.
• A Open File dialog box opens. Select the EBF file that you want to import and click Open.
• After the EBF file has been imported, you have to adjust the cheque location aligned to your printer.
• When done, click on Save button and Close the screen to start printing cheques.
Exporting EBF files
• In the ezyCheque Bank Setup screen, select the bank record you would like to export to EBF file and click on Edit button.
• Go to Other Settings tab and click on  button. button.
• A Export Bank Data dialog box opens. Insert the name of the file you would like to export to at the File name field. Then click Save.
• A dialog box shows up notify you that the EBF file has been exported successfully. Click OK.
• When done, click on Save button and Close the screen.
Back to top
|